Solar Power for Terry Ann
I found installing solar power on my Alberg 35 Terry Ann to be a real struggle. Most of the articles I was able to find focused on estimating power demands and rigging up complex battery banks, whereas I needed to know how to get the wiring into the cabin and how to hook up a simple controller. It took about a year of experimenting with a panel at home before I felt confident to do the boat installation. My goal with this article is to provide explicit, illustrated instructions that will help others make a simple, useful installation.
The first thing is to get a panel that will fit in a location that gets plenty of sun and is safe from being trampled upon. On Terry Ann, I found a good spot atop the cabin, next to the companionway. There was room for a 25 watt panel, which I would use to charge a deep-cycle battery to run my laptop chart plotter, plus a fan and LED light. A separate battery attached to the engine alternator would handle engine starting and running lights. I found a panel at Eco-Worthy that cost $27.56 shipped.
To prepare the panel for a long life, I filled the junction box where the wires are attached with silicone caulk. My friend Phil, who maintains a first-rate electrical installation on his catamaran, told me that panels commonly fail when moisture gets into this box, and potting it with silicone is good practice. Since the cabin top has some camber, I mounted the panel on two locust battens, and then used industrial strength velcro to attach the assembly to the cabin top.
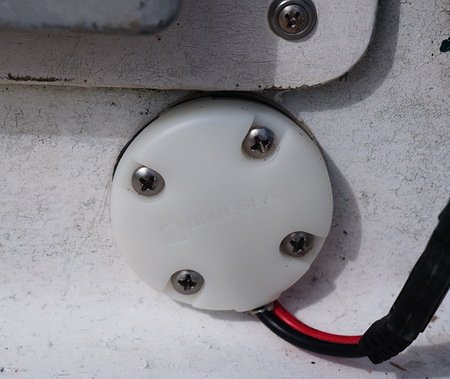
With a panel in hand, the second step was to get the wiring from the panel into the boat. I found a protected spot at the base of the aft side of the cabin where the wiring could be kept out of the way. The watertight fixture I chose, from Blue Sea Systems, required a one-inch hole to be drilled partly through the cabin wall, with a smaller diameter hole in the middle for the wiring to feed through. For a boat with a very thin cabin wall, the one-inch hole might go all the way through, but it will work just as well. Four other holes accepted the mounting screws. I packed all the interior voids with butyl tape, and caulked it with more butyl tape, then firmly drew down the mounting screws. So far, no leaks.
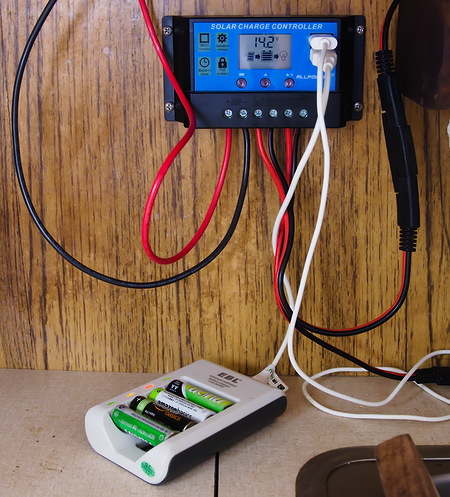
A 25 watt panel is too strong to attach straight to a typical deep cycle boat battery. The output has to pass through a controller that will prevent the voltage from the panel getting too high for the battery to safely accept. For my simple installation, I found an inexpensive but well-designed unit. There are three sets of wire connector sockets on the front of the controller. The center set takes the wires that run to the battery. The left set takes the input from the panel. And the right set provides output directly to a device, in case you need it. There are also two usb ports for charging cell phones and such.
Installation of the controller is simple. Screw it to a bulkhead convenient to the input wires from the panel. Attach the wires to the battery first. You will have to provide your own wires. I used 12 gauge Ancor wire in red and black. Wire a fuse of the right size to protect the wire into the positive lead to the battery. With the battery attached, the controller will immediately start reporting the battery voltage. Now the wires from the panel can be attached. Always attach the battery first, and disconnect the panel before disconnecting the battery. If the panel is attached to the controller with no battery, it can damage the controller. With the panel attached, the display on the controller will show the panel pushing power to the battery - assuming there is enough sunshine for the panel to put out. If there is, in a short while the battery voltage will start to rise. The first time, this is an exciting moment, because it means everything is hooked up right and you now have a working solar installation on your boat.
That's the basic process of installing solar on a boat. Here are a few details. The third set of connectors on the controller let you attach a load to the battery that is regulated by the controller. The instructions with the controller explain how it can be set to turn off this load on low voltage. This will help you keep from running the battery dead. The controller will also automatically turn the load back on once the battery voltage comes up.
There probably are going to be a few connections in your setup. I have a connector under the panel so that if I need to remove the panel, I don't have to unwire it too far. I have another connector in the panel wires close to the controller, so I can disconnect the panel from the inside of the boat if I need to remove the battery (remember, the panel should be disconnected before the battery). I use SAE automotive plugs - those clunky looking things that people use to attach their trailer lights. They are crude, but from my experience reliable. Everything is crimped together using Ancor double crimp connectors. The crimp tool is expensive, and the connectors are too, but even so the cost of using good connectors is a tiny percent of the total cost of the installation.
A fully charged battery should read 12.7 volts and a fully discharged one 11.7 volts. It's best not to discharge a battery over half way, so suppose we have a typical 50 amp deep cycle battery. It has been running a fan all through a muggy summer night, plus a reading light in the evening, and in the morning the controller shows that its voltage is 12.2 volts. As the sun starts to hit the panel, the battery voltage will slowly start to rise. By late morning, the voltage should hit 13, which is where the real charging starts (don't ask me why, that's just what the electrical engineers say). From here, the voltage will start rising more quickly, and by mid-afternoon it should be at 14.2. This is where the controller limits things. It won't allow more than 14.2 volts to the battery, because that would have the potential to damage it. After two hours at 14.2, the controller drops back to float voltage. This is settable, and I have mine set at 13.5 volts. The controller holds the voltage at 13.5 as long as it can, but eventually the sun goes down and the voltage drops off. Hopefully it stabilizes at 12.7, a full battery, and you have power for another night.
When the controller shows 14.2 volts and then afterward 13.5 volts, that's when you get free power. The controller is regulating the input from the panel down to what the battery can accept. So that's the time to hang your cell phone or AA battery charger on a usb connector. The panel is providing more power than the battery can accept, so why not use it for something else?
I have to say, as much of a struggle as it has been, getting this simple solar setup going has been a blast, and I'm glad that I have a supplement to engine power for my electrical needs. I would rather sail than run the engine, so the solar panel means having at least a few amp-hours to burn each day . This setup will handle a good deal more than 25 watts, and I may add a second panel in parallel at some point. If you are like me and learn by doing, I suggest you try setting up a simple installation like I have described, and I'm sure you will find all kinds of ways to customize it for your needs.
Text and Photographs by Paul Clayton. Posted 10/02/20.
Copyright © 2020 Paul M. Clayton


